CloudNativePGを動かしてみる
はじめに
- Kubernetes ClusterにPostgreSQLのOperatorを調査し、CloudNativePGとPerconaのOperatorがよさそうだった
- 公式ドキュメントを参考にOperatorの最低限の使い方を調べた
調査結果
- Full exampleを中心に、状況に応じて設定を変えていけば良さそう
- アプリケーションからは
cluster-example-full-rw(後述)というService経由でDBにアクセスする
環境
- WSL2 Ubuntu 20.04 on Windows 11
- KinD
$ kind versionkind v0.17.0 go1.19.2 linux/amd64
手順
- (テスト用のKinD clusterを作成)
$ kind create cluster --name pg - CloudNativePGのインストール
$ kubectl apply -f https://raw.githubusercontent.com/cloudnative-pg/cloudnative-pg/release-1.18/releases/cnpg-1.18.1.yaml - deploy.yamlを作成
- 内容
apiVersion: v1 data: password: VHhWZVE0bk44MlNTaVlIb3N3cU9VUlp2UURhTDRLcE5FbHNDRUVlOWJ3RHhNZDczS2NrSWVYelM1Y1U2TGlDMg== username: YXBw kind: Secret metadata: name: cluster-example-app-user type: kubernetes.io/basic-auth --- apiVersion: v1 data: password: dU4zaTFIaDBiWWJDYzRUeVZBYWNCaG1TemdxdHpxeG1PVmpBbjBRSUNoc0pyU211OVBZMmZ3MnE4RUtLTHBaOQ== username: cG9zdGdyZXM= kind: Secret metadata: name: cluster-example-superuser type: kubernetes.io/basic-auth --- # apiVersion: v1 # kind: Secret # metadata: # name: backup-creds # data: # ACCESS_KEY_ID: a2V5X2lk # ACCESS_SECRET_KEY: c2VjcmV0X2tleQ== --- apiVersion: postgresql.cnpg.io/v1 kind: Cluster metadata: name: cluster-example-full spec: description: "Example of cluster" imageName: ghcr.io/cloudnative-pg/postgresql:15.1 # imagePullSecret is only required if the images are located in a private registry # imagePullSecrets: # - name: private_registry_access instances: 3 startDelay: 300 stopDelay: 300 primaryUpdateStrategy: unsupervised postgresql: parameters: shared_buffers: 256MB pg_stat_statements.max: '10000' pg_stat_statements.track: all auto_explain.log_min_duration: '10s' pg_hba: - host all all 10.244.0.0/16 md5 bootstrap: initdb: database: app owner: app secret: name: cluster-example-app-user # Alternative bootstrap method: start from a backup #recovery: # backup: # name: backup-example superuserSecret: name: cluster-example-superuser storage: storageClass: standard size: 1Gi # backup: # barmanObjectStore: # destinationPath: s3://cluster-example-full-backup/ # endpointURL: http://custom-endpoint:1234 # s3Credentials: # accessKeyId: # name: backup-creds # key: ACCESS_KEY_ID # secretAccessKey: # name: backup-creds # key: ACCESS_SECRET_KEY # wal: # compression: gzip # encryption: AES256 # data: # compression: gzip # encryption: AES256 # immediateCheckpoint: false # jobs: 2 # retentionPolicy: "30d" resources: requests: memory: "512Mi" cpu: "1" limits: memory: "1Gi" cpu: "2" affinity: enablePodAntiAffinity: true topologyKey: failure-domain.beta.kubernetes.io/zone nodeMaintenanceWindow: inProgress: false reusePVC: false - 上記の内容は、公式のFull example(
cluster-example-full.yaml)からバックアップに関する部分をコメントアウトしたもの - その他のExampleはこちらから:https://cloudnative-pg.io/documentation/1.18/samples/
- 内容
- deploy.yamlをデプロイ
$ kubectl apply -f deploy.yaml
デプロイ結果
- deploy.yaml 30行目の
nameに紐づけた文字列(この例の場合cluster-example-full)の後に、-any、-r、-ro、-rwというsuffixがつくServiceと、-1、-2、-3(instancesの数値による)というsuffixがついたPodが生成される - 前節の手順で生成されるServiceは下記の通り
$ kubectl get services --all-namespacesNAMESPACE NAME TYPE CLUSTER-IP EXTERNAL-IP PORT(S) AGE
cnpg-system cnpg-webhook-service ClusterIP 10.96.127.19 <none> 443/TCP 10h
default cluster-example-full-any ClusterIP 10.96.63.78 <none> 5432/TCP 24sdefault cluster-example-full-r ClusterIP 10.96.43.45 <none> 5432/TCP 24sdefault cluster-example-full-ro ClusterIP 10.96.7.85 <none> 5432/TCP 24sdefault cluster-example-full-rw ClusterIP 10.96.92.119 <none> 5432/TCP 24sdefault kubernetes ClusterIP 10.96.0.1 <none> 443/TCP 10hkube-system kube-dns ClusterIP 10.96.0.10 <none> 53/UDP,53/TCP,9153/TCP 10h- 通常、他のPodからDBにアクセスするときに使うServiceは下記の3つ(参考:https://cloudnative-pg.io/documentation/1.18/applications/)。アプリケーションからPostgreSQLを使用するときはService経由でアクセスする
cluster-example-full-any:PostgreSQL インスタンスの検出を管理するために内部で使用され、アプリケーションによっては使用されないcluster-example-full-r:Read-only workloadで、どれかのレプリカに接続するcluster-example-full-ro:Read-only workloadで、Hot stanbyのレプリカに接続する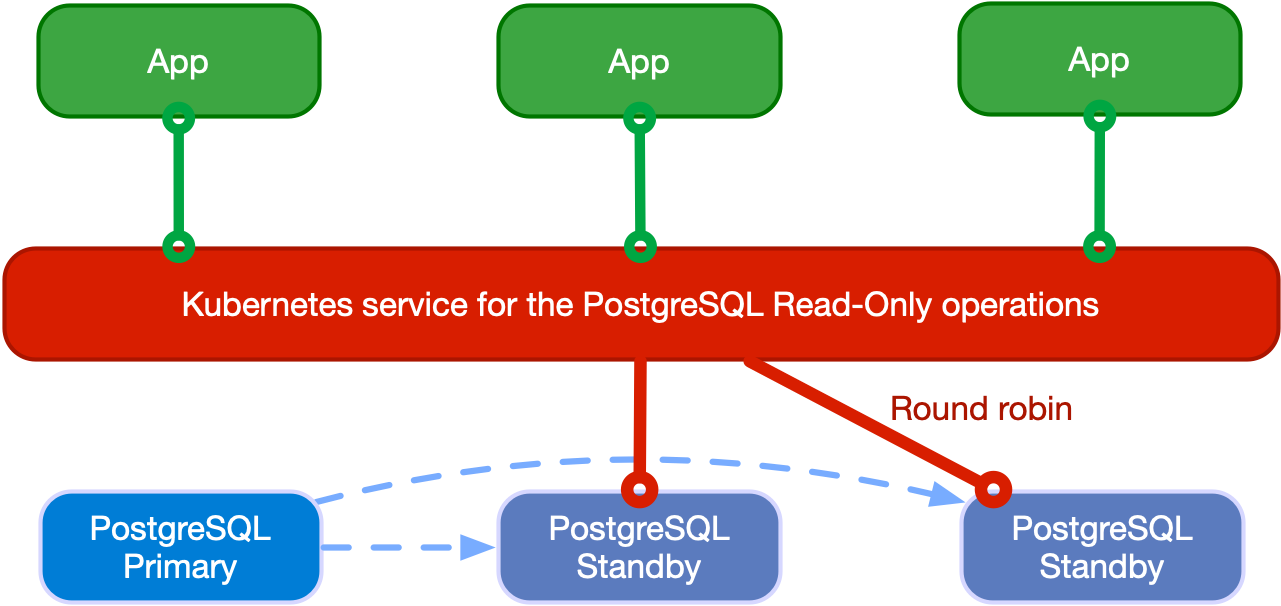
Read-only workloads cluster-example-full-rw:Read-write workloadで、PrimaryのPodに接続する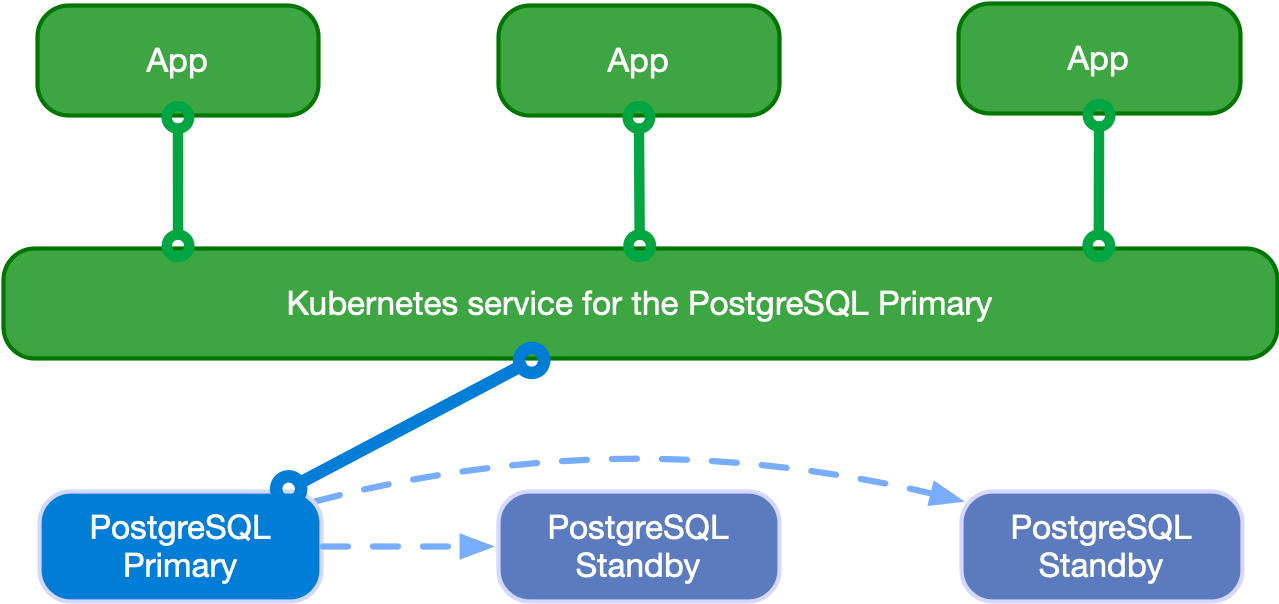
Read-write workloads
- 前節の手順で生成されるPodは下記の通り
$ kubectl get pods --all-namespaces
NAMESPACE   NAME                                     READY STATUS  RESTARTS AGE
cnpg-system cnpg-controller-manager-7c499bfdcb-2v5bt 1/1   Running 0        14h
default     cluster-example-full-1                   1/1   Running 0        3h48m
default     cluster-example-full-2                   1/1   Running 0        3h48m
default     cluster-example-full-3                   1/1   Running 0        3h48m
(以下、略)